How do I set up the Magento Newsletter Plug-in?
In this section we explain how to use the Newsletter2Go Extension for Magento.
Hint: In Order to use the Magento Plug-in, you will need your own Newsletter2Go Account. If you don’t already have one, you can create your own account for free here.
1. Installing the Newsletter2Go extension for Magento
Download the Newsletter2Go plug-in for Magento from our plug-in center.
Log in to your Magento shop as admin and open the Magento Connect Manager, which can be found under “System“ > “Magento Connect“ > “Magento Connect Manager“.

In field “Direct package file upload“, click “Choose File“ and upload the Newsletter2Go plug-in. Click the upload button and wait until the installation process is completed.

When the installation process begins, the progress should be indicated in the console at the end of the page. The installation is complete when this screen is shown:

2. Giving API access
2.1 Creating OAuth-Consumer
To authenticate yourself via REST-API, a Consumer Token needs to be created.
Please open “System“ > “Wen Services“ > “REST-OAuth Consumers“.
Click “Add New“ and enter a name and your current admin password. Then, click “Save and Continue Edit“. Copy the values of fields “Key“ and “Secret“. Make sure fields “Callback URL“ and “Rejected Callback URL“ are empty.
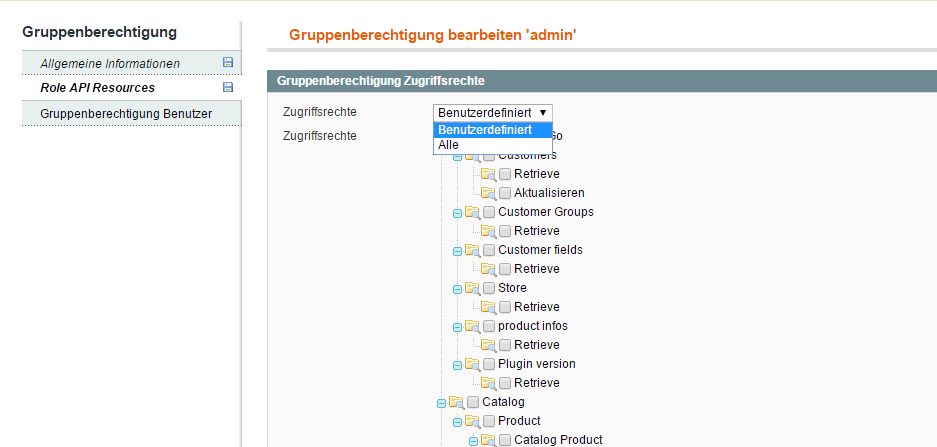
2.2 Creating and configurating admin role
Next, access rights for Magento-REST-service have to be created.
Please open “System“ > “Web Services“ > “REST-Roles“.
- Click “Add admin Role“ in the upper right corner of the screen. A new screen “Add new Role“ should open.
- Enter a role name (e.g. “administrator“). After saving, tab “Role API resources“ should be visible on the left.
- Browse to this tab, where “Role Resources“ should be visible now. Select „all“ from the dropdown and save your settings.
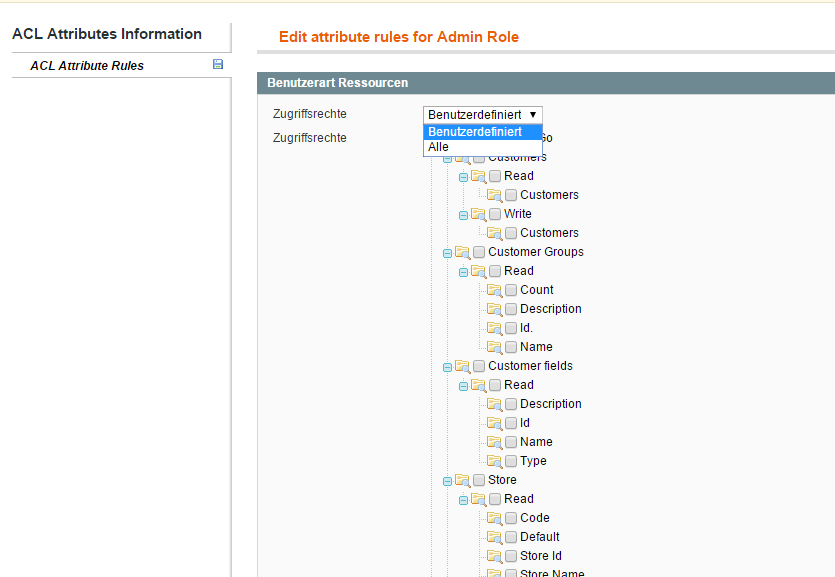
2.3 Setting up resource attributes and access rights
Go to “System“ > “Web Services“ > “REST-Attributes“. There should be 3 user-types: Admin, Customer and Guest.
Click “Admin“ and select “all“ from the dropdown under “User type resources“. Save your settings.
2.4 Attributing a REST-Admin Role to an existing admin account
Go to “System“ > “Permissions“ > “Users“. Select an existing admin account. In screen “Edit user“, navigate to tab “Rest Role“ on the left. Select the radio box for the Rest-Role you just created and save.

2.5 Authorize access
Complete the installation by setting up the plug-in in Newsletter2Go. Here, enter your Shop-URL, your Key and your Secret.
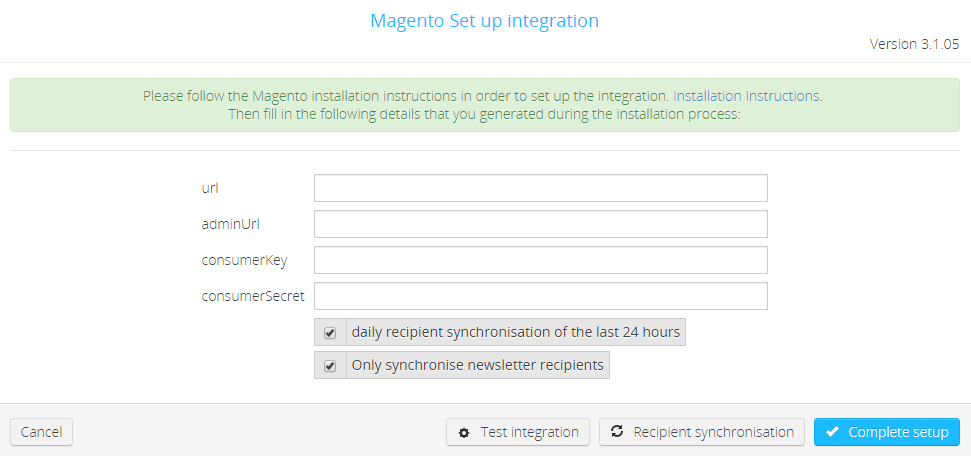
When you have completed the installation, it is recommended to test the integration. When all data are correct, you will be forwarded to a Magento page where you authenticate yourself. This step will be skipped if you are already logged in to Magento during the installation.
Next, authorize access for the plug-in.
Click „Authorize“ to complete the set-up of the plug-in successfully.

Newsletter2go verwendet Cookies, um Ihnen den bestmöglichen Service zu gewährleisten. Wenn Sie auf der Seite weitersurfen stimmen Sie der Cookie-Nutzung zu. Ich stimme zu.
